We've moved to our new blog!  Please update your readers to our new feed:
Showing posts with label Quilt Block. Show all posts

Wednesday, September 12, 2012

A Cold and Some Bee Blocks

A cold has kept me down for the past week or so.  The kids got it and recovered quite quickly...so, imagine my dismay when I came down with the same thing and have been slow to mend!  I think it's all the busy-ness of being mama that has kept me under the weather!  But, I did manage to make and mail some bee blocks!

Stash Bee, August {I know, super late!} for Rachel, mammafairy sews.  The block is Starry Night by Faith of Fresh Lemons, which was my first real attempt at foundation paper piecing!  Good thing Faith has amazing directions!


Next up, Modern Stitching Bee, September for Chrissy of Sew Lux {my favorite fabric shop!}, the block is "Four Acres" from Modern Blocks: 99 Quilt Blocks from Your Favorite Designers.  It was a fun, easy block!


Okay, that's all for now, hopefully this cold will get better and I can get back to work.  Right now I think I need a cup of hot tea with honey some tea in a cup of honey, and to watch a Jane Austen movie on the couch...

Friday, August 10, 2012

Some Old & Some New Grannies


I really went scrappy here! What do you think, I am wondering if the blocks and arrangements of fabric in each block is too different from each other to be in one quilt? I would appreciate your input!


Monday, August 6, 2012

Making for a Quick Sew

I have been cutting and stacking my squares for the granny square quilt I have been working on. This is much quicker for me. I simply place the cut squares in the order I want to sew them in and then place the layers of squares on a small cutting mat. This way I can move the mat around and put it on my table right next to my sewing machine.  There are some wonderful mini design boards I have seen but have not made one yet, although I do have the supplies to do so!


Sewing them in the chain sewing method is so much faster than each square individually.

 I have also learned that there are many, many names for the granny square block. It is so funny when you realize that everything old is new again.

I am enjoying seeing all the variations on so many blogs, I am really glad I decided to join in on all the fun, if you haven't begun your own yet, you may just want to!


Monday, July 9, 2012

Granny progress and fun stuff


Three more grannies made!


I really like  Mollie Makes magazine, this is only my second one I have purchased. They are filled with such pretty and creative ideas, so fun to just look at over and over.

I also just loved the Union Jack quilt I saw as a giveaway prize, I didn't win but I really wanted the pattern and so I bought it online from Busy Bee Quilt Designs. Can't wait to make it. Maybe that will be motivation for me to get busy and finish up some of my other projects, or just start something new!


Two of the new lines that I think are just so pretty, Marmalade and Coquette, love, love, love, them and they are on my list for yardage.

Hope you have a happy and productive week! I know sewing is on my list of fun things to do!


One thing I forgot to mention:   Check our Destash page, we still have a few more things we are selling, plus a few more things that we will be listing soon.

Monday, July 2, 2012

String Scrappy Star


As I mentioned before, it's my month for my quilting bee!  So here's my block {I took this picture at night, so it's a bit blurry, I'll update it tomorrow!}, it's made with the string version of my scrappy star.  This is my first quilting bee experience, so I'm pretty excited to put together a whole quilt of these blocks, selvages and all!

Monday, June 18, 2012

Sewing with Selvages {Tutorial}

It is my month for my quilting bee in July! I am asking for the string version of my scrappy star, made with a few selvages. So, as a precursor, I'm going to do a bit of a tutorial on using selvages in the block, even if you're not in my quilting bee, I hope you find this useful!


First, for this specific block, there are chevrons in the center with the star points, so, on two of the 5" x 4" paper rectangles, draw a 45 degree angle going one direction, then draw it the other direction on the other two.


I find that strips ranging from 3/4" to 1 1/2" and anywhere in between are the best sizes for these blocks.  Adjust your stitch length to something shorter, this will make tearing the paper away much easier {I set mine at 1.5 instead of its regular 2.5}.  Start with two strips, right sides together, then place them parallel to one of the drawn angles and stitch them down.  Then press them open.  Place another strip, right sides together with the edges matching and continue sewing in the same manner.


To add a selvage, place the fabric right sides up over one of the strips, with about 1/4" extending beyond the selvage edge.  Then stitch the selvage down on both sides, as shown in the picture above.  This will give the seam plenty of strength and keep the selvage in position {since selvage edges don't have the same stretch as the body of the fabric.  Please note: do not cut the fabric above the selvage away, this will leave a raw edge on the top of the quilt block!


Then continue piecing the block by sewing strips right sides together and then pressing open.  Your fabrics should extend a little bit beyond the papers.  Then, from the back side trim to required measurement.  Please note:  this may not be the exact size of the paper, so please measure the block when you trim!


For this particular block, you will then cut the 4" x 5" rectangle into two 2" x 5" rectangles.  When you place this rectangle with one going the opposite direction, you will have the chevrons.  Piece the corner 5" x 5" squares in the same manner, but it won't matter what direction the angle is going, as long as it is diagonal across the square!

And there you have it, a little bit of sewing with selvage edges, I'm really excited to see some string blocks come together!

Thursday, May 31, 2012

A Wonky Star

In the past, I may have said I don't really get the whole wonky thing...I like even, regular, orderly things {however, if you saw my sewing area right now, you probably wouldn't believe that...there is so much fabric piled on the cutting table that I've been reduced to using my travel mat on the floor...but that is beside the point}.


That being said, my bee block this month was a wonky star, and I love it {tutorial from here}!  So, I guess I am entitled to change my mind, right?  In spite of the blue look, the background is actually Kona Coal and then I used a variety of fabrics from my stash {note the center square, it is a scrap of Coquette by Chez Moi for Moda that is left from the Moda Bake Shop project I'm working on - let me tell you, I adore this line!}.

I've asked this before, I think, but do you participate in any quilting bees?  Do you have a favorite block you've made?


Thursday, March 1, 2012

Garden Steps :: Assembling the Blocks


Questions? Missed a post? Find the index here.


Our next step is assembling the blocks.  According to the cutting directions, you should have four 2" strips and four 2 1/4" strips of each colored fabric and twelve 4 1/2" white/neutral blocks for embroidery.

When I piece blocks based on strips of fabric, I like to sew and then trim.  This allows for all the pieces to fit even if there is a tiny adjustment in seam allowance or a shift in placement.  So, these directions are based on that technique.  It is not necessary to cut the strips down.

For help with cutting and piecing, download the cutting diagram here.

Take two of the 2 1/4" strips, and starting at the raw edge, sew them to one of the 4 1/2" squares:


After trimming the strips, set the long portions aside.  These will be your 16" strips on another block.  Next, trim the pieces on the block to 1 3/4" wide, as shown.  Repeat with another set of 2 1/4" strips.


The next four pairs of strips will all be 2".  Continue to sew and then trim the strips in the layout as shown:


Finally, the remaining two pairs of strips are 2 1/4" wide.  As with the other strips, trim the length, but leave the strips 2" wide.  All the blocks will eventually be trimmed to the same measurements before sewing together.  This extra width is to allow for any fraying that occurs while stitching.

While it is not necessary to assemble all the blocks at once, I found it easiest to work in an assembly line fashion for my block assembly.  That way I always used one of each fabric for each piece.

Also, I arranged my fabrics in a row for each colorway and then just followed the same repeat, bumping the print to the next position each time {I hope that makes sense}.

So, that should take care of the assembly instructions.  If you have any questions, do not hesitate to ask!


Don't forget to show and tell in our Flickr Group! Did you blog about the quilt along, your fabric selection, or threads? Share your post here {please link to a specific post or Flickr photo}:

Tuesday, February 28, 2012

I Joined a Quilt Bee

Yes, if you think I am crazy, you're right.  I've actually banned myself from signing up for anything else.  Anything.  This means I had to take a pass on the Doll Quilt Swap and the Scrappy Mug Rug Swap.

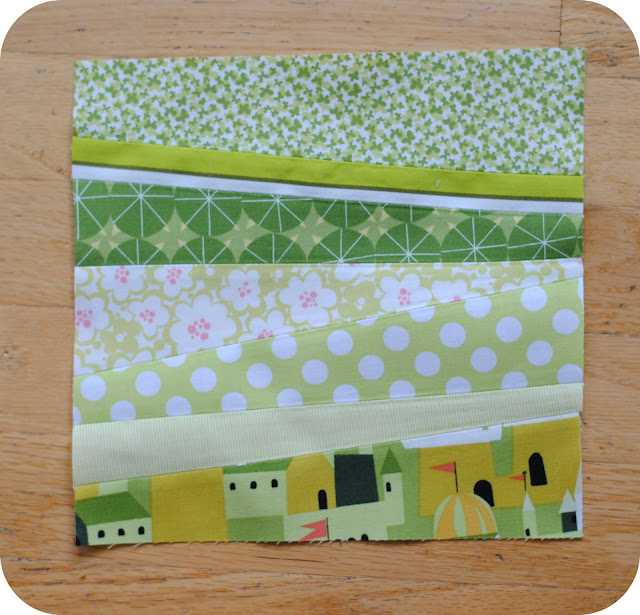
But back to the Bee.  Sunni is coordinating the Stash Bee {she's actually starting a Hive #4, if you're interested!}, and I'm a member of Hive #2, which started in February {I know, talk about waiting until the last minute!}.  So, here's the block I made for Miki {who is making a rainbow quilt}:


Lime seemed to be the color I could best make a monochromatic block from, so here is my attempt.  Let me tell you, this random piecing thing requires a lot more thought that just following a tutorial.  I think this block took me almost two hours to make!


I used Just Wing It, Castle Peeps, Ta Dot, and Flights of Fancy, they all seemed to go well together.  I put a little too much thought into the signature block...only to mess it up!  I  don't know why I put the word "by" on it...I wasn't even thinking!  I might make a new one {sorry it is out of focus...too dark, I'll snap a new photo in the morning!}...


So, there it is, first completed bee block. Bring on March!

Thursday, November 24, 2011

Pinwheel Toss {tutorial}


I'm not here today, I'm posting over at Sew We Quilt as part of the November Block Party with my Pinwheel Toss quilt block.  And have a very Happy Thanksgiving too!


Edit to Add: You can now find the tutorial here too!